FreeTrack Forum
FreeTrack Forum > FreeTrack : English Forum > Support : Tracking System > Your point model constructions
| benmeijer | #46 19/10/2008 - 11h55 |
|
Class : Habitué Off line |
My Infrared headset 3 point model:
What you need: 3 x IR led type SFH485P (the best leds for Freetrack) 3 x resistor 33 Ohm or 30 Ohm Batteryholder with on/off switch 2x AA 1.5 v Cheap headset or an old one Heatshrink Ty-raps Installationwire (UTP cable!) Old pen (for upper led) Metal wire (from an old paint bucket)         |
| BECK | #47 21/10/2008 - 06h05 |
|
Class : Apprenti Off line Www |
My
   |
| didja | #48 21/10/2008 - 18h42 |
|
Off line Www |
Your builds are quite nice looking !
Rémy   |
| congo | #49 23/10/2008 - 21h09 |
|
Class : Apprenti Off line |
I took a different approach and mounted the webcam on my headphones since it was already fitted with the necessary USB cable. I then found a 120 led nightlite and swapped out the white led for an IR. I was only interested in SP tracking which closely mimics the most movement in cockpit. Works like a charm and if I can ever figure out how to attach photos maybe I'll post some.
|
| congo | #50 05/11/2008 - 16h23 |
|
Class : Apprenti Off line |
 [/img]I took a different approach and mounted the webcam on my headphones since it was already fitted with the necessary USB cable. I then found a 120 led nightlite and swapped out the white led for an IR. I was only interested in SP tracking which closely mimics the most movement in cockpit. Works like a charm and if I can ever figure out how to attach photos maybe I'll post some. [/img]I took a different approach and mounted the webcam on my headphones since it was already fitted with the necessary USB cable. I then found a 120 led nightlite and swapped out the white led for an IR. I was only interested in SP tracking which closely mimics the most movement in cockpit. Works like a charm and if I can ever figure out how to attach photos maybe I'll post some.  [/img] [/img] |
| congo | #51 05/11/2008 - 16h32 |
|
Class : Apprenti Off line |
Info on above photos. Transmitter is a childs nightlite with the ir diodes mounted in the left engine nacelle and a white diode in the cockpit to indicate when it is active 120V. The receiver is a Microsoft VX-3000 with ir filter removed and visible light filter installed. always 30fps. Im a happy pilot.
|
| Gravata | #52 07/11/2008 - 03h28 |
|
Class : Apprenti Off line |
Improved version of my 3 point cap "without a cap".
(With 5v 100ma Infrared LEDs... very bright)    The custom made power supply box. In: 12v Out: 3x 5v 100ma     The white stuff is thermal grease to help transfet heat to the PCB, cause those resistors heat up to 70° to provide the 100ma :P WiiMote with custom stand. (goodbye crappy webcam! :D)  
Edited by Gravata on 07/11/2008 at 05h22.
|
| recycle | #53 23/11/2008 - 11h05 |
|
Class : Apprenti Off line |
HeadPhoneClip made from a bike flash
Used materials: - bike flash lamp - PCB slices - "Attack super glue" to glue the PCB slices - FDD cable for wireing - mini switch - IR LEDs, resistors - one Green LED (with 470 Ohm resistor, just for a faint indication of the PowerON state) - Patex glue  The original LEDs are removed. One LED is replaced to green (not to interfere with the IR), the other LED holes are good for the resistors. The IR LEDs are stitched twice through the PCB to fasten stable.    The original rubber pushbutton was removed and replaced with a mini switch  The clip must be removed and the hole of the original pushbutton must be enlarged to have a square hole for the switch to put in from outside.  Well, the PCB needed a little cut and rasping to fit by the switch. The chip was cut form the "outside world", and the 470 Ohm was placed here for the Green LED.  The original PCB drawing needs to cut here and there.  |
| didja | #54 23/11/2008 - 13h14 |
|
Off line Www |
Wow, that's a really nice system !!! Great work !
Rémy |
| NuMcA | #55 30/11/2008 - 11h35 |
|
Class : Apprenti Off line |
Here is mine:
 Construction: - Skeleton made from LEGO parts (5X 1X8 LEGO plates). 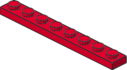 - Skin from black hot glue. - Osram SFH485P IR LEDS from RS Online  - 5mm LED lenses from RS online which now give me more than 120 degrees(!) of head-turning tracking without cutting down the LEDS. With just 5 for 0.25GBP  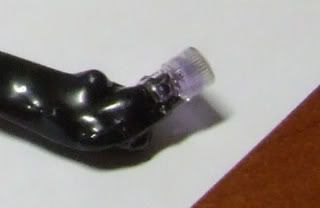 - Powered by two 2 AA Battery connected in parallel with the 3 LEDs, each on its own Resistor. |
| SixIron | #56 20/12/2008 - 20h58 |
|
Class : Apprenti Off line |
The parts all came from Radio Shack. It could have been built for under $10 if I didn't get all fancy with a power switch and power connector.
Dual-AA battery box 3 Hi intensity IR led's (1.2v 100ma) Lighted switch M power receptacle couple resistors Old junk Nokia cell phone charger for juice (3.7v) Kids magic wand for hard plastic tubing A little super glue and epoxy. Used 220 sandpaper to flatten the LED's and angle the tubing ends so LED's would superglue flat. Works great in normal room lighting, even some daylight, with a MS VX3000 web cam. Did not need to modify camera in any way, just change settings.  
Edited by SixIron on 20/12/2008 at 21h04.
|
| PKM | #57 22/12/2008 - 16h51 |
|
Class : Apprenti Off line |

Edited by PKM on 23/12/2008 at 02h41.
|
| 67th_MiracleMan | #58 23/12/2008 - 16h59 |
|
Class : Apprenti Off line |
There it goes the arms to hold up the leds are plastic pens lol and the IR leds i pick them up from old optic mouses. I think that is the cheapest 3 point headset clip ever. LOL
[img=http://img266.imageshack.us/img266/6128/pc200209vz5.th.jpg]  |
| Padesatka | #59 02/01/2009 - 00h31 |
|
Class : Apprenti Off line |
LED Center has a handy wizard for selecting resistors to match diodes, and for drawing circuit diagrams:
LED Array Wizard
Edited by Padesatka on 02/01/2009 at 00h32.
|
| AlarmedBread | #60 08/01/2009 - 14h41 |
|
Class : Apprenti Off line |
That's funny I had a similar idea. Was hunting around the house for some LED's when I noticed a bike flasher that already had 3 of them wired up with a switch.     The tape is just temporary in case I need to change anything with the design it's easy to remove. |


![[img=http://img266.imageshack.us/img266/6128/pc200209vz5.th.jpg]](http://img266.imageshack.us/my.php?image=pc200209vz5.jpg)
FreeTrack Forum > FreeTrack : English Forum > Support : Tracking System > Your point model constructions
> Stats
1 user(s) connected during the last 10 minutes (0 member(s) and 1 guest(s)).
Powered by Connectix Boards 0.8.4 © 2005-2024 (8 queries, 0.020 sec)