FreeTrack Forum
FreeTrack Forum > FreeTrack : English Forum > Support : Tracking System > Webcam compatibility feedback
| dmxgordon | #226 10/01/2012 - 07h44 |
|
Class : Apprenti Off line |
Hi, I need some help please.
I bought a new camera called Gembird CAM66U, wich I see it's a compatible camera and has easy to disable autoexposure. The thing is that i don't know how to disable autoexposure. I only get 8 FPS in FreeTrack. Can someone help me please? I can see that Vonkugel has 30 FPS with this camera. Post #79 i also disable exposure from freetrack:  Still i get 8 fps...
Edited by dmxgordon on 10/01/2012 at 19h47.
|
| shesakillatwo | #227 22/01/2012 - 19h05 |
|
Class : Apprenti Off line |
Wanted to drop a quick BIG THANKS to everyone on this site for making my Freetrack effort such a huge Success. So thank you very much!
Important Note: Brand new unmodifed PS3Eye works great! After reading hundreds of posts I set about my project. I decided to buy a PS3Eye as there were a few posts imply modification of the Camera was un-necessary for the newer model. The fact that I had enough Best Buy Reward Zone points to get it for Free helped the decision. I got it home hooked it up and loaded the software. Basic camera functioned flawlessly. Built a removeable IR filter by taking a floppy disk as described and glued it to a cut down PVC Pipe Coupler I got at the Home Improvement Store. Slips right on and off easily. Tested this with Freetrack and my Stereo System Remote. Perfect!!! Ordered 20 ( I always buy extras for Development Projects ) SFH485P IR-led from Digi-Key which arrived 2 days later USPS. Went to Radioshack and picked up the smallest project box (actually it was this blinking LED box with a power switch!) I could find along with some resistors and a red LED. Stopped and picked up a USB cable from a local computer store. Had most of the other stuff on hand like wire, solder, heatshrink, & hardware. I assembeled the project using ball point Pen tubes for the arms which were Hot Glued into the project box. The arms were attached using the standard "Clip" specifications. I wired up all the diodes and resistors to the power switch so that the IR diodes were in a Series circuit with a 10 ohm resistor and the Red LED and its In-Series current limiting resistor (~50 Ohms) was in Parallel to the IR Diode Circuit. All the grounds were tied together and connected to the Ground lead on the USB Cable and the Hot lead from the USB cable was connected to the other switch terminal. I mounted a clip on the back with some hadware so this could easily clip onto my headphones and we ready to go. I amazed myself in that it worked flawlessly from test number 1!!! Now all I have to do is figure out how to tweak this for my games. Thanks once again to all those who have posted! |
| haeni8 | #228 18/02/2012 - 09h39 |
|
Class : Apprenti Off line |
I bought the Logitec c310. Can I use it with Free-track ? I Found no removable filter.
Thanks for your support. |
| casualgamer | #229 21/02/2012 - 18h54 |
|
Class : Apprenti Off line |
Well if you rewind back one page you can see my little experience with it. It's IR filter seems to be right on top of the CCD, not easily removed. I destroyed one of my 2 Logitech C310... But it works pretty well anyway, so it shouldn't be necessary to remove it. I just put a piece of floppy disk material in front of the lens (but under the casing, so it sits permanently) to filter visible light. It would help if you stated your OS etc also I think. I have Windows Vista Ultimate 64 bit. Logitech webcam driver did not work, I had to remove that and just use Vista's driver. I got about 16 FPS out of it. I haven't played with it a lot though. |
| PL_Cmd_Jacek | #230 10/03/2012 - 19h44 |
|
Class : Apprenti Off line |
I have the same situation with Microsoft Lifecam VX-800. I am not able to find how to disable autoexposure.  Help, please EDIT (13/02/2012) : solved - everything works good. The value above should be -4 for my camera 
Edited by PL_Cmd_Jacek on 12/03/2012 at 10h01.
|
| xxtraloud | #231 21/03/2012 - 22h40 |
|
Class : Apprenti Off line |
thanks for your feedback and info, i went to that website and shipping is quite cheap. I guess I will order from it. I also just bought a PSeye, what is the model number at the bottom? mine is sleh-00448. Also do you have any pictures of your setup, total cost? they suggest not to use USB powered setups. |
| Qpernikuss | #232 19/04/2012 - 12h38 |
|
Class : Apprenti Off line |
I also got the SLEH - 00448 type, which is the "bad" one (with the non removable IR filter), and I really wish to see some pictures of your modification, especially the pipes thing =) Thx in advance... Regards Qpernikuss |
| icaptaincaveman | #233 25/04/2012 - 15h12 |
|
Class : Apprenti Off line |
I.T. Works PCW Panda 9B.
I found this 2nd hand cam for £2.60 so I thought I'd try FreeTrack, it works a treat. I didn't have to modify the cam, I just turned the exposure right down along with the brightness. I think it works slightly better with the I.F. filter removed but this could be me trying to justify the extra work and I'm not going to put the filter back just to give you a comparison.. The lens holder unclips really easily, there's a little slot on the bezel, just insert a small screwdriver and twist gently. The filter came out in one piece with the aid of a pin, again very easily. I have a piece of photo negative as a filter fixed with a tiny drop of glue. I had some standard blue LED's, a pack of resistors and I found a 9volt mains adaptor. The ends of the LED's were sanded down flat, I taped two LED's to the outside of the headphone speakers and glued a piece of thin plastic tubing to the middle of the headband to hold the third LED. This setup works really well with IL 2 1946, why spend all that cash on anything else. Total cost is less than £10 and that included a cheap set of headphones.
Edited by icaptaincaveman on 25/04/2012 at 15h25.
|
| M8R-cxd17j | #234 05/05/2012 - 16h47 |
|
Class : Apprenti Off line |
A4Tech PK-336
- very cheap (but maybe pulled off the stores) - rather narrow FOV (but works well for me) - auto exposure can be disabled - no extra drivers are needed (tested on Win 7) - stable 30 FPS, 0 jitter (at max resolution 640x480; tested with and without IR filter) - manual focus - easy to disassemble - easy to access the IR filter, but you will need sharp knife to get it out - its not really necessary to remove the IR filter - Sensor width: 6.35 mm - Focal length: 6 mm - Aperture: 1.8 - Detailed specification - no mic - rather unhandy clip (but it will do its job) 
Edited by M8R-cxd17j on 10/05/2012 at 09h44.
|
| Rabb | #235 12/06/2012 - 17h15 |
|
Class : Apprenti Off line |
A4Tech PK-333MB
- night vision cam - has 6 built-in IR LEDs - very cheap - IR filter removal not needed - relatively narrow FoV - no zoom - stable 30 fps Note: With this cam, it took me half an hour to make a pointer model, set-up and tune Freetrack and start enjoying games. But, possibly because of my construction, under direct or strong diffuse sunlight, some objects in room may reflect light (glass or smooth plastic) and jitter or sensor jamming appears. Sensitivity adjustment helps to some extent. Considering price/ease of installation/performance, this cam is my absolute Freetrack favorite.  You can read about pointer model here: http://forum.free-track.net/index.php?showtopic=466&page=13#17224
Edited by Rabb on 12/06/2012 at 18h43.
|
| maximilious | #236 29/06/2012 - 23h51 |
|
Class : Apprenti Off line |
Logitech Webcam 9000 Pro
- 1600 x 1200 max resolution - stable 30 fps - need to remove IR filter online tutorial at http://www.ryb.be/projekty/logitech_9000_pro_infrared - Has Zoom - High Quality Mic - Easy to clip on top of monitor - all settings customizable you can try it without IR removal I forgot. Took me 10-15 minutes to remove the IR filter and add a floppy disk piece, most of the time spent removing the IR filter hah. NOTE: This webcam was about $90 when I purchased, I only modified this cam because the PS3Eye is used in our family room by everyone in our home theater system. I only used the camera itself to take pictures a few times and most of the time I used it as a microphone because my headset broke. Overall I am very pleased with this modified webcam, it is very responsive and there is no jitter / lag while playing FSX.  SETTINGS: Free-Track v2.2 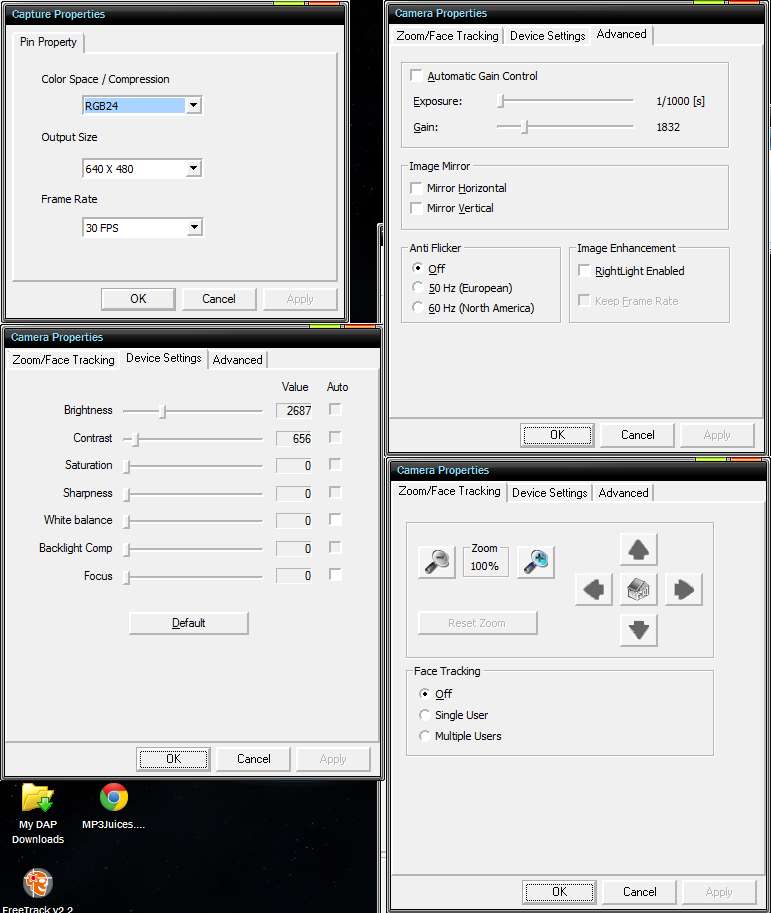
Edited by maximilious on 29/06/2012 at 23h54.
|
| Fia7 | #237 21/10/2012 - 11h42 |
|
Class : Apprenti Off line |
Possible update for the list,:
I used a Logitech C200, mine did not have the easy to remove filter shown in examples but the more difficult (and risky to lens) filter that is in the C120. |
| robert123456 | #238 25/10/2012 - 13h24 |
|
Class : Apprenti Off line |
Here goes another vote for the a4tech pk35n. This little cam is very cheap and i didnt have to touch anything on it, just plug and it spots and follows the clip perfect with 30 fps and no jitter.
You can also adjust exposure to your liking. Been using it for two months now without any kind of probelm. Did i say it was cheap? |
| doveman | #239 03/11/2012 - 01h50 |
|
Class : Habitué Off line |
Oh pants, that's the model I've got  I was hoping to remove the IR filter as it barely picks up my LED at the moment, as you can see here http://forum.free-track.net/index.php?showtopic=3372#17781 I was hoping to remove the IR filter as it barely picks up my LED at the moment, as you can see here http://forum.free-track.net/index.php?showtopic=3372#17781 |
| doveman | #240 03/11/2012 - 01h51 |
|
Class : Habitué Off line |
Is there any real disadvantage with a 30fps camera as opposed to a 60fps PS3 Eye? I really like the look of your clip design but can you (or anyone else) think of ways it could be improved, to minimise the "jitter or sensor jamming" under "direct or strong diffuse sunlight"? Maybe that won't be a problem for my Dad, as he only tends to fly his flight sim in the evenings but he does have the room light directly above his head, so I wonder if that could cause reflection problems? Also, do you think there's any way this could be made to work from about 1.8m away (TV to sofa) or are the LEDs probably just too weak for that distance?
Edited by doveman on 03/11/2012 at 01h57.
|
FreeTrack Forum > FreeTrack : English Forum > Support : Tracking System > Webcam compatibility feedback
> Stats
1 user(s) connected during the last 10 minutes (0 member(s) and 1 guest(s)).
Powered by Connectix Boards 0.8.4 © 2005-2024 (8 queries, 0.042 sec)